Friday, July 19, 2013

Low Carb Cucumber and Cream Cheese Sushi Rolls w/ Spicy Mayo

For that sushi craving that just won't go away!! These were made with ingredients I just happened to have on hand because I didn't feel like making a trip to the market! ^_^
Some Ahi Tuna and Avocado would have made these even better but even without it they were pretty tasty! Mine did not turn out quite as lovely as I had hoped because I don't have a bamboo mat. I used plastic wrap to roll mine. An old friend of mine suggested that if you don't own a bamboo mat one of those cheap wooden like place mats from the dollar store would work just as good. I have one of those and will give it a try next time I make these!

What You Will Need:


For the Rolls:

1 Box of Nori Sheets
6oz Cream Cheese
1 Head of Cauliflower
1 Cucumber

For the Spicy Mayo:

2 TBSP Mayo
1 TBSP Hot Sauce


You want to start by "ricing" your cauliflower. You can do this by either grating it by hand or using a food processor. I used the S blade in my food processor.


The next step is to steam your cauli-rice. I added about a 1/2 TBSP of water to the bowl, covered it with plastic wrap and microwaved it for about 4 minutes. While it is still hot, you want to add 2oz of cream cheese and mix thoroughly. The "rice" will start to become sticky. You want it sticky enough that when you turn the spoon upside down, the "rice" sticks to the spoon!


Now your sticky "rice" is made! It will need to be cooled completely. I suggest refrigerating it for at least an hour but mine actually sat overnight. When it is completely chilled it will be even stickier and look like this.


The next step is the fun part!! ^_^ Now you want to lay your Nori sheet out (on your mat if you have one, I just used plastic wrap)  and using dampened fingers start spreading your "rice" onto the sheet, leaving a little space on the edge.


Make a groove down the center of your "rice" and add your fillings. I cut cucumber and cream cheese into "sticks". I used 1oz of Cream Cheese for 1 roll.


Now it's time to roll your sushi! The important part of rolling is to hold your fillings in place with your fingers while you roll with your thumbs. This will allow for a tighter roll. Mine are a bit loose - I think a mat of some sort would definitely make the rolling technique easier! Voila! Now you have your sushi roll!


Before I cut my roll up, I prepared my spicy mayo. It's super easy - just mix the hot sauce and mayo until well incorporated. You may decide you like a little less/more hot sauce then I do so experiment a bit! Once I had my mayo ready I sliced my roll up and was ready to dig in!!! They were REALLY good!


Here's the Carb Breakdown: This is for ONE roll, a small head of cauliflower will make about 4 Rolls - The spicy Mayo is also enough for all 4 Rolls so I have divided the carb count accordingly

Cauliflower  (2g) - I used about 1/4 of a small head of cauliflower
Cream Cheese (1.5g)
Cucumber (0g)
Mayo (0g)
Hot Sauce (1g)
Nori (1g)

Total Carbs: 5.5g/net per Roll including Spicy Mayo ^_^ VERY yummy and it satisfied my craving for Sushi!

I found this idea of Pinterest - just another reason to love Pinterest!! ^_^

Find Me on Facebook!

Tuesday, July 16, 2013

Low Carb Pizza

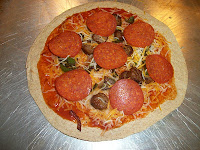
Who DOESN'T love pizza!? Pizza is admittedly one of the foods I missed the most when I first changed my diet. I tried lots of pizza "casseroles" and even tried my hand at a few different kinds of low-carb "crust" but I was never really happy with the results. I wanted a piece of pizza that I could PICK UP and eat that didn't contain soy (PCOS and soy are a bad combo!) I only recently discovered a low carb tortilla that I actually LIKE and today for lunch I thought I'd see how it would hold up as a pizza crust! I was VERY pleasantly surprised at how well it turned out! They are still a bit high in carbs (10.5g) but if you are craving pizza and have the carbs to spare, these are awesome! If you want to give these a try, this is what you will need:

2 TBSP Pizza Sauce (the lowest carb that you can find - check your labels)
2 Sausage Links (Cooked and sliced)
1 TBSP Chopped Green Pepper
1 Thin Slice Small Red Onion, Chopped
7 Pepperoni Slices
4oz Shredded Cheese
1 Large (Burrito size) Low Carb Tortilla

You will want to start by baking your tortilla - I did this in a 400 degree oven for about 12-15 minutes. I baked mine on a cookie sheet.

While your tortilla is baking, you want to saute your peppers, onions and sausage together until the peppers and onions are tender. I did this in my tiny little egg size cast iron frying pan. You could really change these toppings up to whatever pizza toppings you prefer but I just happened to have some leftover cooked sausage links in the fridge.


You want your "crust" to be crisp and hold its shape. When the tortilla is good and sturdy, remove it from the oven. It's time to sauce it! The 2TBSP of sauce is really plenty for a tortilla this size. You want to leave an edge space all the way around your "crust".


Once you have your tortilla sauced it is time to start adding your toppings! I added most of my cheese then the peppers/onions/sausage and then the last bit of cheese. I topped this with my pepperoni slices. I then popped this baby back into the oven, under the broiler for just a few minutes.


Your "crust" should be nice and browned and all of your cheese should be melted. Let it cool for just a minute and then it can be cut into slices with a pizza cutter.


These slices can be picked up and eaten with your hands!  No forks needed!!

Here's the Carb Breakdown:

Tortilla (6g)
Sauce (1.5g)
Green Peppers (0.5g)
Onions (1g)
Cheese (1.5g)
Pepperoni (0g)

Total Carbs: 10.5g/net  *Yum*


****Update**** I later tried this same technique using a Fit&Active LC Flat Bread that I purchased at Aldi. The flat bread was even better, it was slightly thicker then the tortilla and it crisped up really well but the flat bread is 7g vs 6g for the tortilla. In order to counter that I made a philly cheesestak version using ranch dressing in place of the pizza sauce - PHENOMENAL.


Monday, July 15, 2013

Monterey Chicken

Mmmm.... this is one of my FAVORITE chicken dishes. I really love foods with heat and this dish has definitely got heat! It can be easily modified to be more mild for those who don't love the burn. ^_^

What You Need:

2 Pieces of Boneless/skinless Chicken
2 Mid-sized Jalapenos
4 Strips cooked Bacon, Crumbled
1 tsp Cayenne Pepper
1/2C Shredded Cheese 
1 TBSP Sour Cream
1 TBSP Salsa


Begin by pounding your chicken as thin as possible. I used breasts for this recipe. I don't trim the fat from chicken breasts prior to cooking (I think the juices help to keep the breasts from drying out) but you certainly can if you prefer. After pounding them thin, lightly dust the chicken pieces with the Cayenne pepper.


You now want to add your layer of Jalapeno peppers on top of your chicken pieces. You can use fresh or canned. I used fresh for this because we have an abundance of them from our garden but I have also used the kind that come pickled in a jar and they were very good as well. I cut the peppers into thick slices, leaving the seeds because I wanted them to be good and hot. Remember to wear gloves when dealing with hot peppers - you can actually get pretty nasty capsaicin burns if your skin comes into contact with the oils from the peppers. Ouch! These are now ready for the oven! I cooked these on 350 for about 20 minutes.


After about 20 minutes, remove the chicken from the oven and start building your layers - Cheese, Bacon, Cheese.


Then pop it back into the oven under the broiler until the cheese is melted and bubbly. This only takes a few minutes!


When you are ready to serve your chicken, top it with the sour cream and salsa! Voila! Super easy, super tasty chicken! *Yum*
I served this with a side of Parmesan Stuffed Mushrooms 


Here's the Carb Breakdown:

Chicken (0g)
Jalapenos (1g)
Bacon (0g)
Cayenne Pepper (0g)
Cheese (2g)
Sour Cream (1g)
Salsa (1g)*
*Mine is homemade and made with NO sugar, this will vary depending on the type of Salsa you use - check your labels! ^_^

The entire recipe is 5g/net which works out to 2.5g/net per serving. The whole meal, including the 2 stuffed mushrooms came in under 5g/net carbs!!

Sunday, July 14, 2013

Parmesan Stuffed Mushrooms

These are realllllly tasty and super easy to make! They would make great hors d'oeuvres  but they are also good on their own or as a side. Tonight I am having them with my version of Monterey Chicken. The list of ingredients is pretty easy:


3/4 C crumbled cooked sausage
(I use the kind in the roll)
2 TBSP Full Fat Mayo
2 TBSP Grated Parmesan Cheese
4 Medium Sized Mushrooms, Stems Removed


Be sure to wipe your mushrooms with a damp cloth rather then full out washing them. Mushrooms will soak up a lot of water and become spongey when immersed.

Mix the mayo, parmesan cheese and sausage together until it is well blended. Then using a large spoon stuff the inside of the mushroom with the sausage mixture. I like to pile these up a bit because they look so pretty that way and you get more of the yummy mixture too! Place them into a greased baking dish.


You will want to bake these at 350 for about 25 minutes or until the mushrooms are nice and tender and browned.


Here's the Carb Breakdown:

Sausage (0g)
Parmesan Cheese (0.4g)
Mayo (0g)
Mushrooms (2.5g)

Total Carbs: 2.9g/net for the entire recipe which works out to less then 1g per mushroom!

Saturday, July 13, 2013

Cinnamon Clouds 1.75g/Per!

In my SAD (sorry ass diet ^_^ ) days I used to LOVE those cinnamon buns that you can get in the roll with the fake-as-all-get-out cream cheese icing. They used to be one of my favorite breakfast foods. There are a TON of recipes for "mock" cinnamon rolls floating around on the interwebs but most of them require ingredients that I don't use/keep stocked in my cupboard. This morning I was feeling brave and decided to see what I could come up with using the ingredients I already had on hand.

Ingredients:


The "Rolls"
3 eggs, separated
3 oz Softened Cream Cheese
1/2 tsp Cinnamon
6 Drops of Ez Sweetz
1/2 tsp Cream of Tartar


 The Cream Cheese Frosting
3 oz softened Cream Cheese - I think next time I may even drop this down to 2oz, the frosting was VERY rich
4 Drops of Ez Sweetz
3/4 Stick of softened Butter - this could also be decreased to 1/2 a stick I think
2 TBS Cream
1 TBS Water
Dusting of Cinnamon for the tops

You want to separate your eggs, being super careful not to get even a drop of yolk into your whites (the tiniest bit of yolk can keep your egg whites from setting) add in your cream of tartar and beat them on high until stiff peaks form


You can set these aside and now beat together your yolks, sweetener, cinnamon and cream cheese until the cream cheese is well incorporated into the egg yolk. Then you want to GENTLY fold this into your egg whites. DO NOT "MIX" - you want to fold it in, being careful not to damage your peaks in the process.


Once you have your yolk mixture well incorporated into the whites you can start to mound them out onto a greased cookie sheet. You want to definitely make sure to grease your pan! I used cooking spray.


I baked these in a 325 degree oven for 30 minutes. I can't guarantee that to be the correct cooking time - my oven is ancient and sometimes has a mind of its own. I would suggest that you check them after 25 minutes. They should be a nice golden brown when you pull them out. They should feel kind of "springy" to the touch.


Let these babies cool just a bit while you mix all of your frosting ingredients then slather them with frosting and dig in!! They are really fluffy and rich and they pair VERY well with a hot cup of coffee.


These work out to be roughly 1.8g/carbs per bun including the frosting. Here's the carb breakdown:

6oz Cream Cheese (7.2g)
3 Eggs (1.8g)
2 TBSP HWC (0.8g)
1 tsp Cinnamon (0.7g)
 Total Carb Count: 1.75g Per Bun or 10.5g for the entire recipe!


Thursday, July 11, 2013

Yummy Taco Bowls

I had this for dinner tonight and it was sooooo good that I just had to share!! ^_^

I have tried numerous different brands of low carb tortillas and have disliked all of them until now! I found these Mission Whole Wheat Carb Balance ones at the Ingles Supermarket here and they are PHENOMENALLY good. They even get crisp when you bake them! They are 6g/net carbs per tortilla which is a little higher then some of the other brands I have tried but I am okay with 6g - one of these is PLENTY.


Pair one yummy LC tortilla with one super cute taco bowl maker and bake it in a 400 degree oven for about 20 minutes ( at least in MY ancient oven lol) If you don't have one of these (the taco bowl maker, not the ancient oven!) then I recommend you invest in one. I paid $10 for a pack of 4 of them at Fred's. I admit - I later saw these at the Dollar Tree for $1!!! Eeek!! They were generic and perhaps only came with one but my guess is that they would work just as well as the "as seen on tv" type that I overpaid for!


Once my bowl was baked good and crisp I plopped it onto a plate and filled it with all kinds of yummy taco fillings! I filled it with lettuce, hamburger meat cooked w/salsa, shredded cheddar cheese, a few cherry tomatoes and a big dollop of sour cream. I meant to add in some of my homemade pickled jalapenos but I forgot them and I didn't have any avocado but I bet it would be DELICIOUS! This is my end result:


Altogether this came up to roughly 12g/net carbs - this is my carb breakdown:
Tortilla (6g)
Lettuce (0g)
Hamburger meat w/Salsa (1g)
Tomatoes (1g)
Cheese (2g)
Sour Cream (2g)

This could be made a lot less carby if you wanted to cut back on some of the cheese and sour cream but I had the carbs to spare today since I skipped lunch so I piled it on! ^_^ I ate the whole thing and it was very filling and satisfying.


Wednesday, July 10, 2013

Fresh Yummies!

I have decided to rededicate myself to this blog! I can't possibly post EVERY day but I am going to challenge myself to post at least once a week, more so when time allows. I am VERY fortunate that I fell in love with a serious Mr. Green Thumb. Our garden has done wonderfully, yielding us a small truckload of scrumptious fresh produce. This load was from ONE picking:


I am up to my ears in Zucchini! Needless to say, I have been scouring the interwebs for all kinds of Zucchini recipes! I have found some pretty good ones and created a few of my own as well. My greasy beans also did WONDERFUL. They came in nice and full and beautiful!


I have been canning these babies as I pick them - they are by far THE BEST green bean I have ever eaten. They are a mountain bean and not very common therefore it has proven difficult to find an exact carb count for these babies but I am guessing they are similar to other green beans in count and so I figure about 5g/Cup which is just a smidge higher then your typical green bean. I know I can eat them and remain in ketosis just fine and they are simply DELICIOUS! Here they are after I canned them up in my pressure canner along with some of my Zucchini Pickles.


Lastly - I have rediscovered my cheekbones! This is a recent picture of me, taken a couple of days ago. I really love how my face is actually acquiring SHAPE (something other then just ROUND! LOL)