Sunday, January 6, 2013

Low-Carb Cherry Cordial Dessert

The scales loved me this morning - I had a whoosh! Down 3lbs from last weigh in! If I average my weight loss out, I lose roughly 2.6lbs/week so this was an above average week! ^_^  Seeing the scale move always makes me so happy, especially knowing the kind of food I get to eat while doing it! Today I am whipping up one of my favorite low-carb desserts. It is really tasty and super easy to make but it does take awhile to set so it will need to be made in advance. This is an original recipe of mine so if you re-post this somewhere please leave a link back to me! Thanks so much!

Low-Carb Cherry Cordial Dessert


Ingredients:


4oz of Full Fat Cream Cheese
1 small box of sugar free Cherry gelatin
1 Tbsp of  Hershey's Unsweetened Baking Cocoa (100%) - Dark Chocolate
Liquid Sucralose

Step One: Prepare the gelatin as directed on the box. You want the basic preparation. Sit it aside but don't put it in the fridge just yet.

Step Two: Your cream cheese will need to be softened - you can either sit it out prior to use and allow it to soften or you can pop it into the microwave for a few seconds until it is good and soft. Either way, it HAS to be softened or it will get all caught up in your mixing wands! (I learned this the hard way!)  Using a hand mixer, mix the cocoa with the softened cream cheese and add liquid sucralose to taste. I like my chocolate just a little on the bitter side so I probably use a little less sweetener then most. The amount of chocolate can be adjusted if you prefer a stronger chocolate flavor - just remember to adjust your carb count!


Step Three: Now, add your prepared liquid gelatin into the bowl with the cream cheese and cocoa. You want to blend them together with a hand mixer, making sure to get everything blended in good. It will be a bit "foamy" on top.


Step Four: Give it once last stir then cover your bowl with plastic wrap and place it into your refrigerator until it is "set" - about 4 hours.
Step Five: Put some into a pretty dish, top with some whipped cream (optional) and enjoy! ^_^


Carb Breakdown:
8g Cream Cheese
1g Cocoa
0g Gelatin
0g Liquid Sucralose
9g Total - Makes 3 servings at 3g per Serving (this doesn't include any carbs in the optional whipped topping!)

** This recipe can easily be turned into a "mousse" like consistency by doubling the amount of cream cheese and mixing it on high with a hand mixer (to add lots of air) but the carb count does increase! **

Saturday, January 5, 2013

Bacon and Cheese Chicken Roulade

It always annoys me when people tell me they can't stick to a low-carb lifestyle because the food choices are "so boring and limited." In my opinion, your food choices are only as limited as your imagination! If you aren't looking to put a little effort in, then maybe low-carbing isn't for you but weight loss itself requires effort regardless of how you go about achieving it. Personally myself, I like to eat. I have -zero- interest in calorie restriction. I love butter, mayo and bacon far too much to ever be able to be happy giving them up. I can eat delicious food, lose weight doing it and feel like a teenager again by living low-carb. Yep. Sounds much more appealing to me! So... speaking of good food, this is what's on the menu tonight!

Bacon and Cheese Chicken Roulade with a side of Fresh Steamed Broccoli covered in a Lemon Garlic Butter. Sounds just sinful doesn't it? ^_^


These are the ingredients you will need to make 2 Roulades:

2 Boneless Skinless Chicken Breasts
2 Medium-Large Baby Bella Mushrooms Cut into Slices
3oz of Goat Cheese
4 Strips of Pre-cooked Bacon
Grated Parmesan Cheese and Parsley (forgot to include in the pic hehe)

You will also need plastic wrap and a meat mallet or large can to pound out the chicken. I actually use a small aerobic dumbbell wrapped in plastic wrap as a meat mallet! It works great!!! ^_^


You want to start by pounding out your chicken breast as thin as you can get it without tearing it. Placing it between two pieces of plastic wrap to do this makes it a lot easier and less messy! Beat it until it's ugly! ^_^


Once the chicken is thinned out, you want to start adding the yummies that are going to be rolled inside it. I did two layers of cheese, mushrooms and bacon.


The next step is the tricky part! You want to tuck in the ends of the chicken and roll the whole thing, enclosing all those good yummies inside. Once you have done that, transfer the rolled chicken onto a long piece of plastic wrap, seam side down.


Then you want to tightly roll the chicken in the plastic wrap - making sure to get it as tight as you can. You can tighten your roll by holding the ends of the plastic wrap and rolling the chicken away from you. This will snug up the roll! It is just so much easier to show you how to do this rather then trying to explain it, so click here for a video instruction if needed.

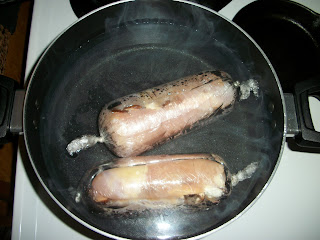
You want it to wind up looking something like this:


Now, while you are working on doing the second Roulade, you want to have a big pot of water on the stove. You want it set to simmer but don't let it boil. When you have both Roulade's made, gently place them into the pot of simmering water and allow them to poach for about 20 minutes. They will not be cooked through! This is just to keep them tender, moist and shaped!


After 20 minutes, remove them from the water and place them into a hot frying pan (a cast iron skillet works GREAT, I just love, love, love cast iron cookware) with a bit of olive oil and butter. Let them brown on all sides.


 Once you've got them browned, they are ready to be "breaded." Shake out a bit of Parmesan cheese onto a plate and roll the chicken in it until it is coated all over. You don't need to dip these in egg first - this is just for a light crumbly coating - the crunch comes from the browned crust on the chicken! ^_^


Once you get them both rolled, place them in a lightly oiled baking dish. Sprinkle lightly with parsley -


 then place them in a 350 degree oven and cook for approximately 45 minutes to an hour. My oven is whacked so you may need to adjust the cooking time to suit your appliance. Poultry can be safely consumed when it registers at 160 degrees on a meat thermometer.

These can be served whole or sliced. Very Yummy!!


 These can be made in a ton of different flavor varieties - ham and cheese for a chicken cordon bleu, broccoli and cheese, spinach and feta... the possibilities are almost endless! They may seem like a lot of work to make but once you have made them a time or two, it will be easy peasy! ^_^


Carb Breakdown:

2g Mushrooms
3g Goat Cheese
3g Parmesan Cheese
0g Bacon                 
8g Total - Makes 2 Servings
4g Per Serving ^_^ 


Thursday, January 3, 2013

Eating With Your Eyes and Detoxing While You Dream!

I had to make a trip to Greenville today to pick up my textbooks for the upcoming semester, so since I was going to be in the general area, I made a detour to spend some much needed sister time with my big sissy. We wanted to get out and exercise a bit so we decided to go walk the mall. The mall in her city is so much more fab then the mall we have here!! Anyhoo, we started off our mall browsing by perusing the Bed Bath & Beyond which we both just love, love, love. My sissy spotted these GORGEOUS clear glass plates that were marked down really cheap and they were square! I really love square plates but the only ones I own happen to be plain white. Now, the Barefoot Contessa (I adore her!) swears that food just looks so much nicer on white plates but I think white plates are a bit drab. I have been on the hunt for some nice square plates because I am absolutely obsessed with taking pictures of just about every meal I eat and I like them to look not-drab. ^_^   Soooo.... the plates went in the bag! Isn't this just gorgeous? I will definitely be eating with my eyes first off of this little lovely!


After scoring these gorgeous plates, we wandered around some more and inevitably landed at the best smelling store in the whole place - Bath and Body Works. We both got this really great smelling aromatherapy lotion. It is meant to be used before bedtime to help you sleep and since I suffer from chronic insomnia I thought I would give it a try. It also boasts that it will help you detoxify while you dream! Well now, who could resist that?! So of course, that went in the bag too!


Cornish Hens were on the menu for tonight but since they need to cook awhile and I wasn't quite ready to leave the mall, handsome honey had to put them in the oven. I just love Cornish Hens. I think they are so cute and yummy!! And.... since he started them early, they were just about ready when I came home. I had just enough time to saute some green/yellow beans to go along with them. And of course, I served this little baby up on my new gorgeous plate!


Doesn't that just look oh-so-scrumptious? Did anyone notice the upside down hen? Yep. Boyfriend cooked the birds upside down! Still tasted good, we coined the recipe "topsy turvey baby chickens." You should try it sometime ^_~


Wednesday, January 2, 2013

Peanut Butter Cups! *Yummmmy!!*

I love anything peanut butter and anything chocolate so of course, I love anything that combines the two! My pre-low carb days were full of Reese's Peanut Butter Cups and a myriad of other sugar laden choco/peanut butter yummies. I have to be honest - I miss my PB cups! I have tried the Sugar Free Reese's and although the taste was satisfactory, sugar alcohols and my body just don't mix. They make me so sick that I would just rather go without then consume them. Not anymore!! I found a recipe online for something called "Chocolate Coconut Bark" and it got me to thinking about all of the other possibilities for coconut oil candies. If you have read my previous blog, you already know how much I adore coconut oil anyway! ^_^ 
So, I made my very first batch of Sugar Free (with NO sugar alcohols!!!) Peanut Butter Cups and I was very happy with them. Figured I would share the recipe with you! There are a few things I will be tweaking for the next batch but the overall end result was pretty fabulous actually. This made 6 big PB Cups.

 Ingredients:


4 Tbsp Coconut Oil - this should be "refined" CO so as not to add any coconutty flavor (though maybe it could be good lol)
3 Tbsp of Peanut Butter - I use all natural, NON-HYDROGENATED 100% peanut butter with no added sugars (Crazy Richards is my favorite, the only ingredient is PEANUTS.)
3 Tbsp of Unsweetened 100% Cocoa - I prefer Dark Chocolate
Liquid Sucralose to Go - I found this at Wal-Mart (as much as I hate WM - I am willing to brave it for this stuff)
Paper Muffin Cups and a Muffin Tin

Directions:

Melt your CO and stir in the Cocoa and Sucralose - the amount of sweetener you use is entirely up to you. I used about 4 "squeezes" but next time I will increase this a little more because I would have liked them to be just a bit sweeter. Once you have the CO, Cocoa and Sucralose all blended together, line a muffin tin with paper muffin cups. I rubbed a little bit of CO onto the papers because I wasn't sure if maybe the candy would stick. Then using a spoon, drizzle enough of the CO/Cocoa mixture into the bottom of the muffin cups. You want it to cover the whole bottom but you also need to make sure to save enough of the mixture for the top layer. Once you have done that, warm the peanut butter just enough so that it has a creamy consistency and is easy to top the chocolate with. This will be the middle layer. Once you have used all of the peanut butter, it is time to add the final layer. Just go back and drizzle the rest of the CO/Cocoa mixture over the peanut butter layer. You want the PB to be covered completely. I should have taken pictures of these steps but I was so excited that I forgot to do it! Once you have all 3 layers in the muffin cups, place the muffin tin in the freezer for about 15 minutes. This will "set" the PB Cups. After about 15 min in my freezer, my PB cups were firm enough to be able to hold. You may need to adjust this slightly depending on how cold your freezer is kept.


Once they are "set" you can enjoy them!! (My favorite part!) I will list the break down of the carbohydrates below. This may vary slightly depending on what brand of PB you use but this is what mine wound up being:


Hershey's Cocoa: 1g of Net Carb per Tbsp - 1g x's 3 = 3g/Net Carbs
Crazy Richard's PB: 2g of Net Carbs per Tbsp - 2g x's 3 = 6g/Net Carbs

Of course, the coconut oil and liquid sucralose contain -zero- carbs so the entire recipe has 9g of Net Carbs and it makes 6 big PB cups which works out to 1.5g Net Carbs per PB cup. I think that is pretty good considering that this recipe is full of natural ingredients without any harsh chemicals or preservatives. A very healthy, low-carb treat and one of these was plenty enough! Even my non-low carbing sweetie liked them!

*** There are a few things I will tweak next time ***

I would like to buy myself a mini-muffin pan so that I could get a larger quantity of smaller PB cups out of the same recipe. Also, as I already stated, I will add more Sucralose. I may even add a squeeze or two into the PB since natural peanut butter isn't sweet. I think they could stand to be a bit sweeter then they were even though they were still pretty damn tasty. Another thing - when I added the middle layer of Peanut Butter, I think some of the PB sank to the bottom of the cup. When I flipped over my finished product, you could see some peanut butter peaking through the chocolate. To remedy this - next time I am going to put the muffin tin in the freezer while I am preparing the peanut butter mixture. Maybe if you allow the first layer of chocolate to "set" a bit before you add the PB layer, it would solve the sinking problem. I may also try to make the bottom layer of chocolate just a bit thicker then I did this time.

I hope you will give these a try and let me know what you think! ^_^